With the new Facebook profile layout, there are 5 Tagged photos of you featured at the top of your profile. What some have already found out is that you can create a hidden message within that, by cropping out 5 seperate pictures of the same image and tagging yourself in them.
For Example -
For Example -
Lol, its just a neat little thing you can do to make your profile a little more interesting.
Steps -
1) Download Gimp 2.6 - Click Here
Basically a much better program to use then paint.
2) Choose an image from the following website ( the one i use ) - Click Here
There are many great high quality images to choose from
3) Once you have selected an image of your liking, copy and paste it to Gimp.
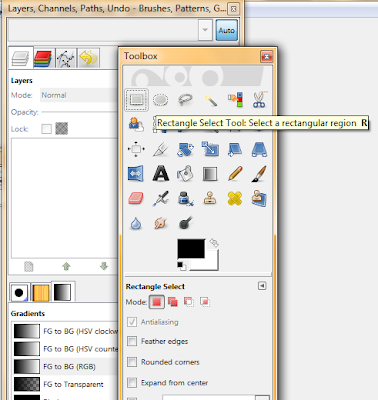
4) In the toolbox, select the " Rectangular Select " option in the top left hand corner.

5) Once that's been done, you can start cropping your image. Start from the left hand side, and crop part of the image. Just make a rectangle around the part of the image you want. ( preferably make the width more than the height) Once you have done that, Right Click > Crop to Selection. Now once you have your 1st part of the image, Resize it to 100 x 71.
 | |||
| Rectangular Select, after this Right Click > crop selection. Then resize new image to 100 x 71. |
- For example, mine would be Red Dead.png
7) Now you have the 1st part saved, easy right? Now all you do now is click the " Edit " button in the top left corner, then " Undo ". Do that twice untill you have the original image which you started with.
- You SHOULD still have the rectangular select in that 1st part of the image. Now you will make another one, select the area exactly where you have left off the 1st. Then crop, then resize. Then save.
( i prefer to keep my separate banner pictures in a folder, to keep better organized.)
8) Now just keep re-doing those steps untill you have 5 images making up your image sized 100 x 71.
- For example: ( sorry if u cant see cuz of the white spaces )


Doesnt look like much now? But now I can upload them into a Facebook album.
9) Now upload them into a new Facebook album or just upload em on your wall, w/e you prefer. Once uploaded go to the pictures, now it's time to tag yourself.
The end of your banner will be the picture you tag yourself 1st, because it will appear at the end of your profile.
- FOR example, The tip of the Gun would be the 1st photo I tag myself in, because it's at the end of the picture. Once you have done that, continue to tag yourself in reverse order.
Example - 1st Tag: Tip of Gun
2nd Tag: Gun
3rd Tag: Face
4th Tag: Hat
5th Tag: Extra space
10) Once you have finished tagging, go back to your profile and your layout will have a fresh new look. A Post will also be on your wall saying you have been tagged in the photos on your wall. I prefer to delete that so no one will know of my secret ^_^.
This is how my profile looks like now -
You can also create a message in your photos using text, such as " Hello ".
I do take Requests for those not understand or just too lazy to do this themselves, lol..
I will also be posting some of my work on here and you're free to use it as you please. But just please make sure to request this page to your friends so they're aware of this. Hope this was helpful and bye for now. ^_^


